
At the top of a rocky switchback, you’ll often see hikers fold their poles and clip them to a pack loop. That’s right before the steepest part of the descent, exactly where poles do the most work.
That timing is backwards.
Poles pay off most on the way down, not on the flat stretch near the trailhead.
That claim gets repeated everywhere: trekking poles cut the load on your knees by 25 percent.
The study behind it found something more specific than that.
A 1999 study is the real source of that number, and it’s more nuanced than the marketing.
What the study on trekking poles actually measured
A small study is where that figure comes from.
Researchers had eight men walk down a ramp angled at 25 degrees, once with trekking poles and once without.
They measured the forces moving through their knees.
Published in the Journal of Sports Sciences, their results showed significant drops with poles across several measures.
Ground reaction force, the knee joint moment, and the compressive and shear forces at the knee all fell with poles.
The range was 12 to 25 percent, not a single fixed number.
The commonly quoted 25 percent is the top of the range, not the typical result.
The researchers also looked at force through the kneecap and the quadriceps tendon.
Those measures dropped too, but the results varied enough between participants that the difference wasn’t statistically significant.
That’s the honest half of the finding that rarely gets repeated.
Where the study reaches its limit
Eight men on a steep ramp is a narrow sample.
Most beginner-friendly trails aren’t graded anywhere near 25 degrees, and the study didn’t include women.
A second study adds some support.
In 2007, researchers had 15 experienced hikers walk downhill with and without poles.
They tested three pack weights: no pack, a day pack at 15 percent of body weight, and a loaded pack at 30 percent.
A significant reduction was found in the load at every joint in the leg, across all three pack weights, according to that study.
The direction is consistent. The exact number you’d get is not something either study can promise you.
If knee pain shapes how you plan a hike, talk to your doctor before changing your routine.
Two studies point the same direction, but neither proves an exact number for your knees on your trail.
That’s still useful context if joint pain is part of your planning, alongside general guidance on hiking with arthritis.
What two poles do that a walking stick doesn’t
A single hiking staff only supports one side of your body.
According to the American Hiking Society, two poles give symmetrical support that one stick can’t match.
Going downhill, poles let your arms and shoulders take over some of the cushioning work your knees would otherwise handle alone.
The organization reports that hikers using two poles feel less knee pain, especially on descents but also on level ground.
The range was 12 to 25 percent, not a single fixed number.
Poles help on climbs too.
Pushing off with them adds power on a steep grade.
They can also help correct your posture, so your head stays up and your lungs have more room to work.
Two poles add two more points of contact with the ground, which is most of what keeps a stumble from becoming a fall.
The American Hiking Society names older hikers as the group with the most to gain, since knee pain is such a common complaint among them.
That stability plays into the same footing awareness covered in tips for preventing falls on the trail.
Setting pole length before your first hike
Most poles adjust in sections, and getting the length right matters more than the brand. Some poles made for Nordic walking come instead in one-piece fixed lengths, matched to your height.
Here’s where to begin.
Stand with the tip on the ground, and set the length so your forearm is roughly level and your elbow sits near a right angle.
- On flat ground, keep that length as your baseline.
- Shorten each pole a little for a sustained climb.
- Lengthen each pole a little for a sustained descent.
Treat those as defaults, not rules.
Adjust by feel once you’re on the trail.
Pole length is a starting point you adjust by feel, not a number you set once and forget.
If you’re new to poles, ease into them on short, flat walks first.
The right footwear prevents more injuries than any other gear choice.
Poles are worth adding only once that part is settled.
A footwear guide is the better place to start if your shoes aren’t right yet.
Using poles on the way down
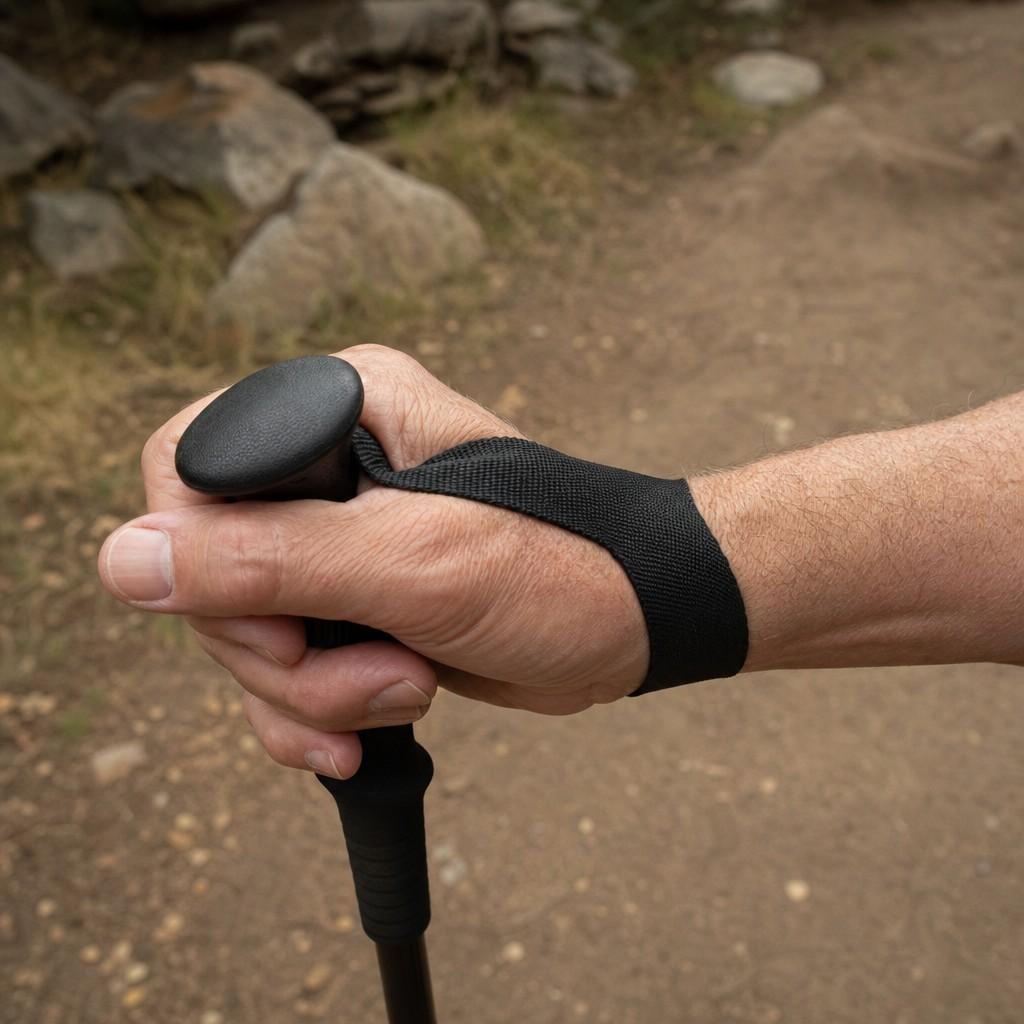
Descents are where the studies found their biggest effect, and where poles are most likely to feel awkward at first.
Put your hand up through the wrist strap from underneath, so the strap carries some of your weight across your palm.
That way you don’t need to grip the pole hard to lean on it.
The direction is consistent. The exact number you’d get is not something either study can promise you.
Plant the pole with your foot, not out ahead of it.
Reaching far in front puts the pole at an angle that gives you less support exactly when you need more.
Most of the knee sparing effect in the research came from leaning forward slightly and letting the poles take real weight, not from holding them.
Slow down on the steepest sections and let the poles do the work the studies measured.
It’s also a good moment to mind your footing, the way covered in general injury prevention guidance.
Using poles without widening the trail
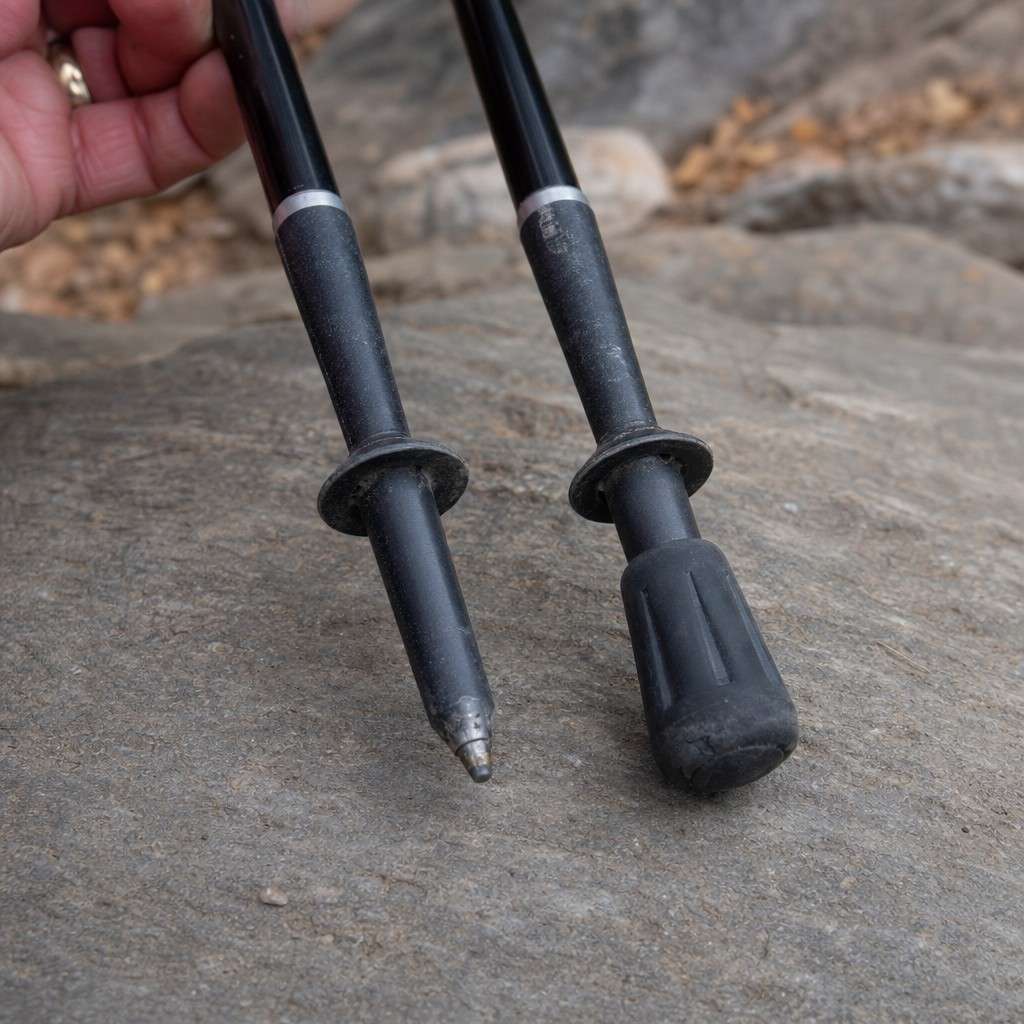
By 2001, J. L. Marion of the USGS, the US government’s earth-science agency, and two colleagues reviewed the environmental and social impact of trekking pole use, noting that the research hadn’t caught up with how many hikers had already picked poles up.
Pole tips are usually hardened carbide steel, which is exactly why they grip rock and soil so well.
It’s also why the American Hiking Society flags them as a real source of trail damage.
Steel tips can scar rocks, speed up erosion, and contribute to trails widening over time.
Three small habits fix most of that:
- Use rubber tip covers where you can. They blunt the sharpest part of the steel point but keep enough traction for normal use.
- Place your poles carefully, skipping rocks that scar easily, fragile plants at the trail edge, and other hikers’ feet.
- Keep your poles narrow, planting tips inside the established tread instead of the softer ground beside it.
A rubber tip and a narrow plant do almost all the work of protecting the trail your poles are helping you walk.
That’s the same logic behind leave no trace guidance: stay on the tread, and the trail stays in better shape for the next hiker.
Next time the trail tips downhill, shorten your poles a notch before you start down. Plant each tip with your foot instead of reaching for it, and keep the tips on the packed tread, not the soft edge beside it.